| Lacasse Fine Wood Products Inc. | search our site |
 |
How To Install Oak Stair Tread
installing stair treads is a great DIY project, all you need is a little knowledge!
Learning how to install oak stair treads is not brain surgery, but rather a set of patience steps (no pun intended). It is one of a few jobs that can be done in bits and pieces, without extensive hand skills. To install hardwood stairs, you need patience and the ability to use a tape measure, and the know-how we are offering below.
Here's the basic stages of stair tread installation:
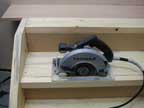
Step #1: Cutting off the existing stair tread nosing
 Typically with a rough set of steps, the stair tread's nosing
extends beyond the back of the step below it. This "nosing"
must be cut off as the first step in install recover hardwood stiars.
Typically with a rough set of steps, the stair tread's nosing
extends beyond the back of the step below it. This "nosing"
must be cut off as the first step in install recover hardwood stiars.
It is easiest to use a power saw for most of the job and finish it with a hand saw when you get closer to each end.... OR if you are lucky enough to own a Fein multi-tool they work great for this job.
Don't worry about losing the "stair tread nosing" as it will be recreated when the new step is put in place.
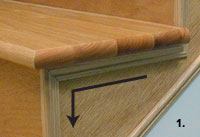
 Check on local building code. Some areas have a maximum Nosing
Extension of somewhere between 1" -1 1/2". We typically recommend 1-1
1/4" for the new treads. Less chance to trip on the lip.
Check on local building code. Some areas have a maximum Nosing
Extension of somewhere between 1" -1 1/2". We typically recommend 1-1
1/4" for the new treads. Less chance to trip on the lip.
Some people believe that if they make the new step much deeper than the existing structure it will make "wider" steps. This is just NOT true.. it just makes the nosing larger and creates a bigger tripping hazard. That is why Building Controls Offices have moved to regulate this particular dimension in home stair construction.
Step #2 -- facing your stringer with 1/4" plywood
 Cut
a piece of 1/4" plywood (in a wood species to match your
tread) to face the sidewall of your steps (called a "stringer").
Cut
a piece of 1/4" plywood (in a wood species to match your
tread) to face the sidewall of your steps (called a "stringer").
In some cases when installing stair treads they may butt directly up against the drywall (as in the picture) and you will choose to create a false stringer to make painting easier down the road.
But this is optional, it is NOT necessary to create a "false" stringer... you can eliminate this step and just fit the stair tread and riser up tightly to the painted drywall.
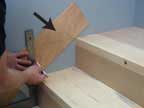
 In
other situations when installing stair treads, the wood steps
will have no exposed stringer at all and the only place you
will need a 1/4" stringer capping is on the underside,
as shown by the arrow here.
In
other situations when installing stair treads, the wood steps
will have no exposed stringer at all and the only place you
will need a 1/4" stringer capping is on the underside,
as shown by the arrow here.
If you cut a strip of plywood approximately 12" wide and tack it on the side of the steps you can trace from the inside the cut out shape.
Then use a chop saw or hand saw to cut out the appropriate notches. This panel is easily glued and tacked into place.
Step #3: facing your risers with 1/4" plywood
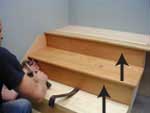 Out
of the same material cut a rectangular piece of plywood to
cover the back of the first step. Glue and nail into place,
aligning it flush with the landing or the main floor nosing,
if this is the top stair.
Out
of the same material cut a rectangular piece of plywood to
cover the back of the first step. Glue and nail into place,
aligning it flush with the landing or the main floor nosing,
if this is the top stair.
Trim your first step to size, installing stair tread, using stair tread adhesive to glue it into place. Most standard construction glues work great. I tend to use the PL400 or PL premium, just because they come in a caulking tube for easy application. Its a great adhesive and stair tread can be easily glued in place with limited mess.
Add a few finishing nails from the top to hold in place while glue dries....fill holes with an appropriate stick.
Work your way down the steps, first the upper stair tread and then the riser below until you reach the bottom floor. Notice that the crow bar is holding the plywood tight to the upper step, letting it gap on the bottom.
Add stair tread moldings as necessary.
Notes:
- Add lots of extra screws & glue to your rough construction stairs BEFORE you glue down the new hardwood stairs. Test for squeaks and adjust accordingly early on in the job.
- Sanding stairs to 180-220 grit does not seem necessary when you receive your steps, but in staining applications will guarantee a more uniform colour application.
- Install prefinished stair treads. Custom fit everything to size, then take it all off-site and prefinish stair treads before installation. Allow finish to harden for 48 hours before installation.
- Be generous with the stair tread adhesive. Not only does it hold the stair in place, but it also works as a rubber gasket to prevent squeaks between the new and old wood steps.
|
Save to: |